Cerumen Removal: Manual Removal and Irrigation
-
Avoid excessive pressure during irrigation, as this may erode or rupture the tympanic membrane
-
If using irrigation, use caution when inserting the tip of the irrigation unit into the ear, as the tympanic membrane is easily punctured
-
Stop the procedure if a tympanic membrane perforation injury is suspected during the procedure. Watch for symptoms suggestive of injury such as severe pain, vertigo, tinnitus, sudden change in hearing or hearing loss, or bleeding from behind the cerumen
Manual Removal
-
Soft cerumen: Use a curette for removal
-
Hard cerumen: Use a blunt, flexible plastic loop and a small right-angle hook for removal
-
Alligator forceps, as needed
Irrigation
-
Otoscope or light source and aural speculum
-
Cerumenolytic agent (e.g., half-strength peroxide - equal parts 3% hydrogen peroxide to tap water)
-
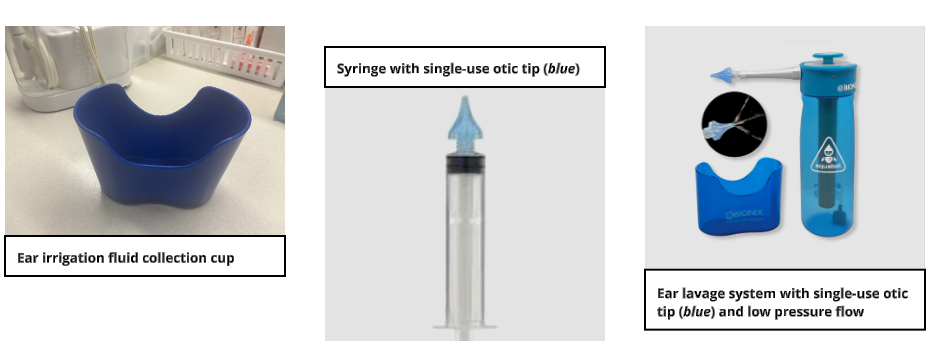
Ear irrigation fluid collection cup or emesis basin
-
Absorbent pad, towel, or barrier drape
-
Device options:
-
Large syringe with single-use otic tip
-
Commercially available ear lavage system
-
-
Irrigation solution: Lukewarm, soapy (minimal or very small amount of hand soap) tap water
-
It is important to position yourself and your patient so that you can optimally view into the ear canal, and you and your patient are both comfortable
-
Ensure adequate lighting
-
For manual removal, consider positioning the patient supine or semi-reclined, with their head supported
-
For instillation of a cerumenolytic agent, position the patient in supine, with the head turned and the ear facing upward so that the medication remains in the ear canal
-
For irrigation, consider having the patient in a sitting position or semi-reclined with their head supported and turned toward the affected ear
General Considerations
-
Advise the patient not to move their head during the procedure
-
For a patient who is 3 years old or younger, gently pull the pinna down and back, to straighten the canal before inserting the otoscope
-
For a patient who is older, gently pull the pinna up and back before inserting the otoscope
-
Stop the procedure if the patient experiences dizziness or pain
Effective Use of Instruments
-
Soft cerumen can be effectively removed using irrigation and/or curettes
-
Hard cerumen can be more easily removed with cerumen loops and small ear hook instruments
Manual Removal
-
Use instruments under direct visualization
-
Remove cerumen using a curette for soft cerumen or a loop or hook for firm cerumen, if needed, extract cerumen using an alligator forceps
Irrigation
Irrigation is done only if there are no contraindications. Contraindications include tympanostomy tube, acute or chronic tympanic membrane perforation, history of tympanoplasty, possible expandable or metallic foreign body, major otologic surgery within the past three months, or trauma
-
Drape the patient with a towel(s) to create a barrier for the cerumenolytic agent and irrigation solution, as hydrogen peroxide will stain clothing, or ask a family member to remove the patient's shirt
-
Mix the cerumenolytic agent (half-strength hydrogen peroxide - equal parts 3% hydrogen peroxide to tap water) in a medicine cup
-
Instill a cerumenolytic agent (half-strength hydrogen peroxide) and allow it to work for 5 minutes prior to irrigation
-
Inform the patient that irrigation will cause a loud noise
-
Fill the syringe with irrigation solution. Use lukewarm, soapy tap water (with a minimal or very small amount of hand soap). Avoid cold water to minimize the risk of dizziness, nystagmus, and nausea
-
Insert the single-use otic tip approximately 0.5 cm into the canal and not beyond the hair-bearing skin that defines the cartilage-bone junction
-
Have the patient or family member hold the ear irrigation fluid collection cup snugly under the ear to catch the irrigation solution
-
Direct a low-pressure stream of water to the lateral aspect of the auditory canal near the cerumen, as this will allow the cerumen to be propelled out by the water accumulating behind it.
-
You may need to make multiple attempts. Therefore, observe the patient for tolerance of the procedure
-
Manual removal may be reconsidered if unable to resolve impaction with irrigation
If impaction was successfully resolved based on post-treatment otoscope evaluation:
-
Monitor for bleeding, tinnitus, and vertigo
-
Provide education on measures to control cerumen accumulation (e.g., mineral oil drops, carbamide peroxide (Debrox) drops)
If unable to resolve impaction based on post-treatment otoscope evaluation:
-
Refer to ENT for further treatment (or plan for ENT follow-up if patient is already established)
-
Instruct the patient to use mineral oil drops for 7 days prior to the ENT visit
-
If an ear infection is suspected, please refer to the Acute Otitis Media Clinical Pathway
References
Dinces, E. A. (2025). How to remove cerumen manually and with irrigation. In the Merck Manual Professional Version. Merck & Co., Inc. Retrieved September 24, 2025, from https://www.merckmanuals.com/professional/ear-nose-and-throat-disorders/how-to-do-ear-procedures/how-to-remove-cerumen-manually-and-with-irrigation
The Nemours Foundation. (2020). Dealing with earwax (cerumen). https://kidshealth.org/ChildrensMercy/en/parents/earwax.html
These pathways do not establish a standard of care to be followed in every case. It is recognized that each case is different, and those individuals involved in providing health care are expected to use their judgment in determining what is in the best interests of the patient based on the circumstances existing at the time. It is impossible to anticipate all possible situations that may exist and to prepare a pathway for each. Accordingly, these pathways should guide care with the understanding that departures from them may be required at times.